> ## Documentation Index
> Fetch the complete documentation index at: https://docs.splox.io/llms.txt
> Use this file to discover all available pages before exploring further.
# Quickstart
> Build your first AI workflow in 5 minutes
## Welcome to Splox
Splox has two products: **Agent Chat** for using pre-built agents, and the **Workflow Builder** for creating your own. This quickstart covers both.
**chat.splox.io**
Browse agents and start chatting — no setup required. Also available as a [desktop app](https://splox.io/download) for Windows, macOS, and Linux.
**app.splox.io**
Build and customize multi-agent workflows visually
***
## Step 1: Start with the Template
**Your first multi-agent workflow**
A simple agent connected to tools - ready to customize and extend.
**Includes:**
* Voice and text interaction
* Tool integration examples
* Pre-configured AI model
**Time:** 2 minutes to first chat
Click the card above to open the starter template in Splox
See the visual graph: Start → Agent → Tools. Each node is a step.
The template works out of the box. Customize later as you learn.
***
## Step 2: AI Provider (Optional)
The starter template uses Splox's default AI provider - no setup needed. You can switch to your own API keys later.
**Bring your own OpenAI or Anthropic key** for direct billing.
1. Get an API key from [OpenAI](https://platform.openai.com/api-keys) or [Anthropic](https://console.anthropic.com/)
2. Go to Settings in Splox
3. Enable BYOK and enter your API key
4. Select it in your workflow's agent node
**For now:** Skip this and use the default provider to get started faster.
***
## Step 3: Understand the Workflow
The starter template shows you the basics:
Entry point of your workflow. Defines what triggers it.
The AI that processes requests. Can use multiple tools and reason through complex tasks.
Actions the agent can take - API calls, data processing, integrations with 10,000+ tools.
Connect nodes to define data flow. Tool edges let agents dynamically choose which tools to use.
**Click any node** to see its configuration. You can edit prompts, change models, and add more tools.
***
## Step 4: Chat with Your Workflow
Once your workflow is ready, chat with it directly from the builder:
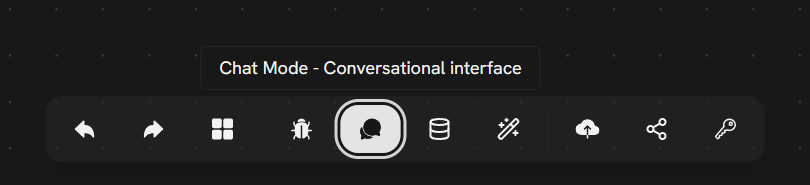 1. Click the **Chat icon** (speech bubble) in the toolbar on [app.splox.io](https://app.splox.io)
2. Select your **entry node** from the dropdown
3. Type or speak your message
4. See the agent respond in real-time — watch nodes execute in the workflow as it runs
**Supports:** Text and voice input
**API** — Trigger programmatically:
```bash theme={null}
curl -X POST https://app.splox.io/api/v1/workflow-requests/run \
-H "Authorization: Bearer YOUR_TOKEN" \
-H "Content-Type: application/json" \
-d '{"workflow_version_id": "...", "chat_id": "...", "entry_node_ids": ["..."], "query": "Process this data"}'
```
See the full [API docs](/api-reference/introduction) for details.
***
## Step 5: Monitor & Debug
Keep an eye on your workflow executions:
1. Click the **Chat icon** (speech bubble) in the toolbar on [app.splox.io](https://app.splox.io)
2. Select your **entry node** from the dropdown
3. Type or speak your message
4. See the agent respond in real-time — watch nodes execute in the workflow as it runs
**Supports:** Text and voice input
**API** — Trigger programmatically:
```bash theme={null}
curl -X POST https://app.splox.io/api/v1/workflow-requests/run \
-H "Authorization: Bearer YOUR_TOKEN" \
-H "Content-Type: application/json" \
-d '{"workflow_version_id": "...", "chat_id": "...", "entry_node_ids": ["..."], "query": "Process this data"}'
```
See the full [API docs](/api-reference/introduction) for details.
***
## Step 5: Monitor & Debug
Keep an eye on your workflow executions:
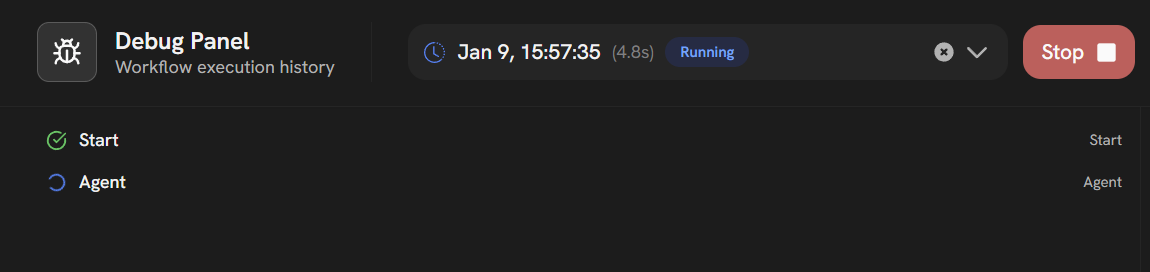 **Debug Panel** - Shows real-time execution status:
* View all nodes in your workflow
* See which nodes are running, completed, or blocked
* Monitor execution time and status
* Click any node to inspect its input/output
View all past runs, see which nodes succeeded/failed, and inspect outputs.
**Location:** Workflow → Executions tab
Watch your workflow run in real-time. The Debug Panel shows node-by-node progress with status indicators (Running, Completed, Blocked).
**Location:** Debug Panel (sidebar during execution)
If a node fails, the workflow stops. Click the failed node to see the error message.
**Fix:** Update configuration and re-run
Every node stores its output. Reference it in later nodes using `{{ node_id.output }}` syntax.
**Example:** `{{ llm_1.content }}`
***
## Next Steps
Now that you've chatted with your first agent, here's what to explore:
Connect from 10,000+ MCP tools and skills to make your agent domain-specific
Connect multiple agents where each handles a specialized task
Master Agent nodes, Tool nodes, Switch logic, and more
Browse and chat with published agents
***
## Need Help?
Chat with the team and other users
Get the native app for voice chat with agents
**Stuck on something?** Most questions are answered in our [Core Concepts](/concepts/workflows) guide. If you're still stuck, reach out on [Telegram](https://t.me/splox_ai)!
***
## Quickstart Checklist
Make sure you've completed these steps:
* [ ] Opened the [starter template](https://app.splox.io/templates/019b36e4-f41b-7d9f-9b4d-fb87d550f21f) on app.splox.io
* [ ] Chatted with an agent on [chat.splox.io](https://chat.splox.io) (voice or text)
* [ ] Explored the workflow graph (Start → Agent → Tools)
* [ ] (Optional) Downloaded the [desktop app](https://splox.io/download) for voice chat
* [ ] (Optional) Added your own API keys via BYOK
**All done?** You're ready to customize and build your own workflows!
**Debug Panel** - Shows real-time execution status:
* View all nodes in your workflow
* See which nodes are running, completed, or blocked
* Monitor execution time and status
* Click any node to inspect its input/output
View all past runs, see which nodes succeeded/failed, and inspect outputs.
**Location:** Workflow → Executions tab
Watch your workflow run in real-time. The Debug Panel shows node-by-node progress with status indicators (Running, Completed, Blocked).
**Location:** Debug Panel (sidebar during execution)
If a node fails, the workflow stops. Click the failed node to see the error message.
**Fix:** Update configuration and re-run
Every node stores its output. Reference it in later nodes using `{{ node_id.output }}` syntax.
**Example:** `{{ llm_1.content }}`
***
## Next Steps
Now that you've chatted with your first agent, here's what to explore:
Connect from 10,000+ MCP tools and skills to make your agent domain-specific
Connect multiple agents where each handles a specialized task
Master Agent nodes, Tool nodes, Switch logic, and more
Browse and chat with published agents
***
## Need Help?
Chat with the team and other users
Get the native app for voice chat with agents
**Stuck on something?** Most questions are answered in our [Core Concepts](/concepts/workflows) guide. If you're still stuck, reach out on [Telegram](https://t.me/splox_ai)!
***
## Quickstart Checklist
Make sure you've completed these steps:
* [ ] Opened the [starter template](https://app.splox.io/templates/019b36e4-f41b-7d9f-9b4d-fb87d550f21f) on app.splox.io
* [ ] Chatted with an agent on [chat.splox.io](https://chat.splox.io) (voice or text)
* [ ] Explored the workflow graph (Start → Agent → Tools)
* [ ] (Optional) Downloaded the [desktop app](https://splox.io/download) for voice chat
* [ ] (Optional) Added your own API keys via BYOK
**All done?** You're ready to customize and build your own workflows!