> ## Documentation Index
> Fetch the complete documentation index at: https://docs.splox.io/llms.txt
> Use this file to discover all available pages before exploring further.
# Workflows
> Understanding workflows in Splox - the foundation of automation
## What is a Workflow?
A **workflow** in Splox is a visual, node-based automation that connects AI models, tools, and integrations to accomplish complex tasks. Think of it as a programmable flowchart where each box (node) performs a specific action, and arrows (edges) define the execution path and data flow.
Workflows are the foundation of Splox, enabling you to:
Build autonomous agents that reason, plan, and use tools to complete complex tasks
Connect AI agents to external tools, APIs, MCP servers, and third-party platforms
Agents iterate autonomously — calling tools, processing results, and deciding next steps
Create collaborative AI systems where multiple agents communicate with configurable execution modes
Route execution through branching paths with Switch nodes and conditional edges
Fan out to multiple branches and merge results back together
### Key Capabilities
* **Visual Programming** — Build complex logic without code using an intuitive canvas interface
* **Chat Mode** — Test interactively with a conversational interface and real-time streaming
* **Flexible Patterns** — Support for sequential, parallel, conditional, and agent-loop execution
* **Real-time Testing** — See nodes execute live with immediate feedback and streaming output
* **Version Control** — Track changes, publish versions, and roll back when needed
* **Voice & Realtime** — Build voice-enabled agents with realtime audio capabilities
## Workflow Structure
### Node Types
Every workflow is built from **5 node types**:
Entry point that receives input data and triggers execution
Autonomous AI agent with LLM, memory, tool calling, and streaming
Executes operations via MCP servers, custom tools, or external APIs
Conditional branching with multiple operators and AND/OR logic
Waits for all parent branches to complete, then merges their outputs
You can also add **Note** nodes to annotate your canvas — these are visual-only and don't execute.
### Edge Types
Nodes connect through **4 edge types** that control execution flow and data transfer:
Standard execution flow — triggers the next node when the source completes
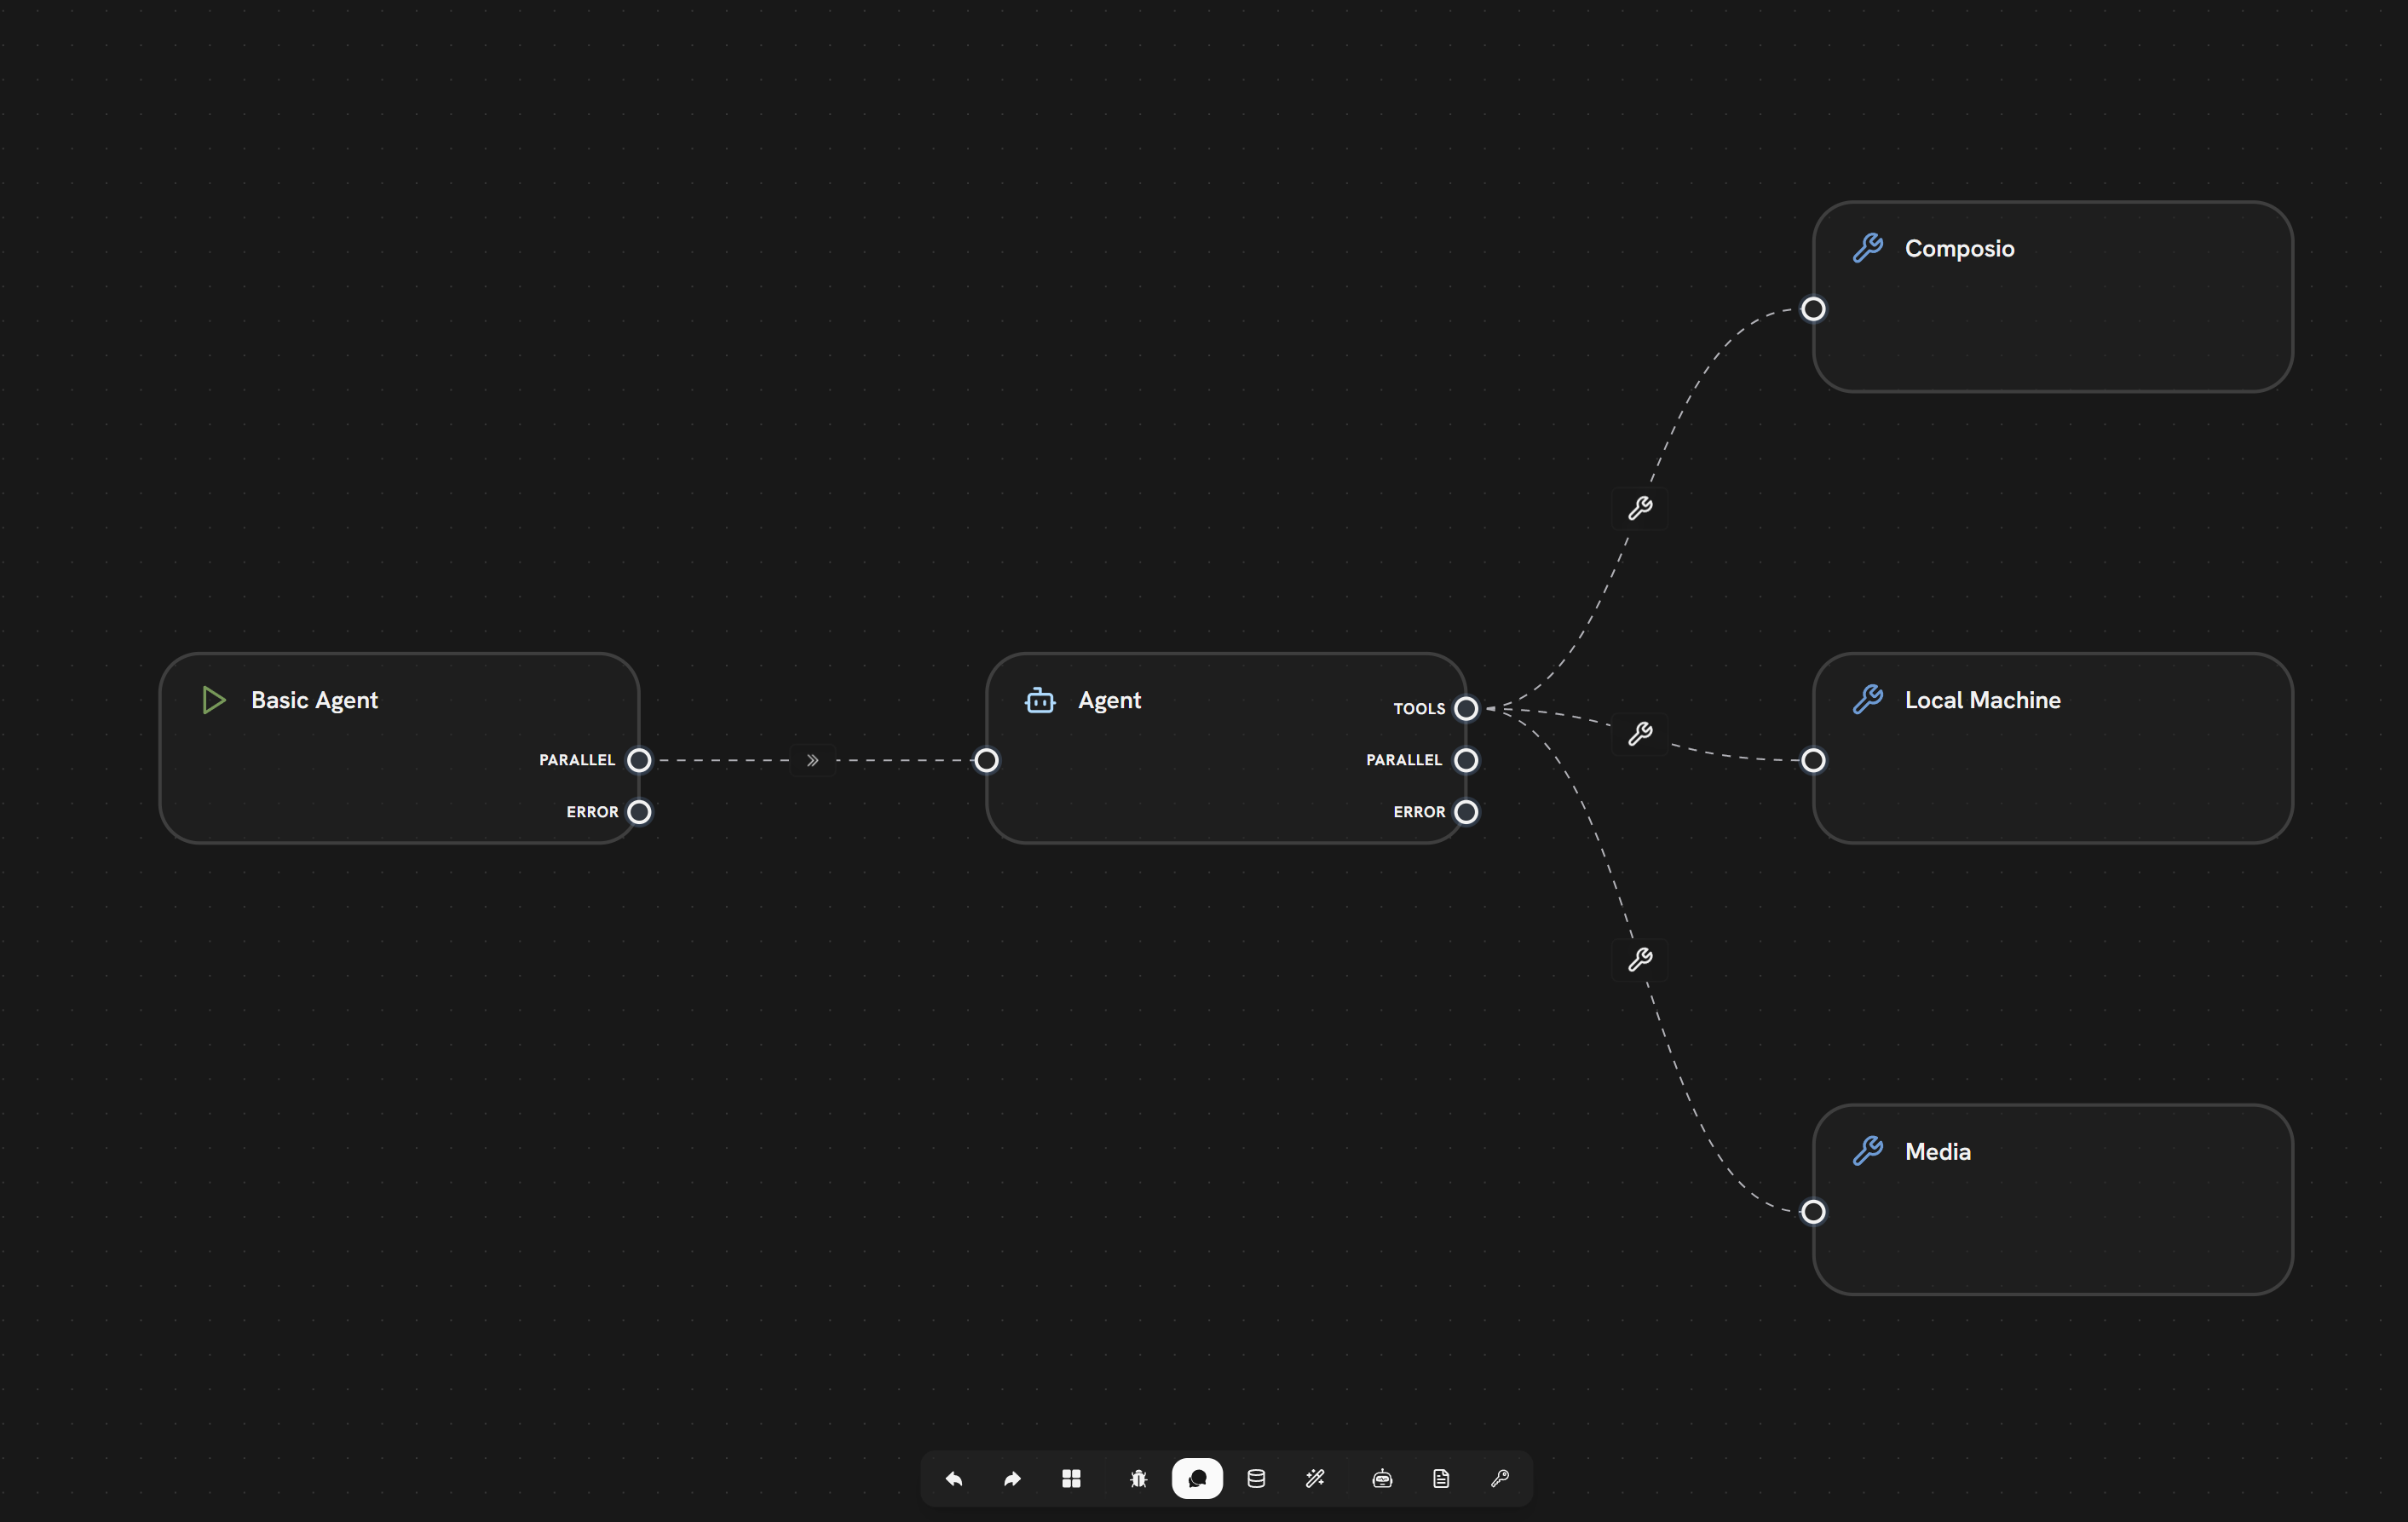
Connect an Agent's TOOLS handle to Tool nodes for autonomous tool calling
Route execution from Switch nodes based on IF/ELIF/ELSE conditions
Activate when a node fails, enabling graceful error handling
### Visual Canvas
Workflows are built on a visual canvas with powerful editing capabilities:
Right-click anywhere on the canvas to open a context menu with available nodes
Draw edges between nodes by dragging from output to input handles
Click any node to open its settings panel and configure parameters
Pan by dragging the canvas, zoom with mouse wheel or trackpad
 ## Workflow Lifecycle
When you create a new workflow, Splox automatically:
* Generates a unique workflow ID
* Sets up an empty canvas
* Assigns it to your account
* Creates initial configuration
Build your workflow by:
* Adding nodes from the context menu
* Connecting nodes with edges
* Configuring each node's settings (LLM model, system prompt, tools, etc.)
* Saving your changes
**Start simple** — begin with a Start → Agent flow and add complexity as needed.
### Chat Mode
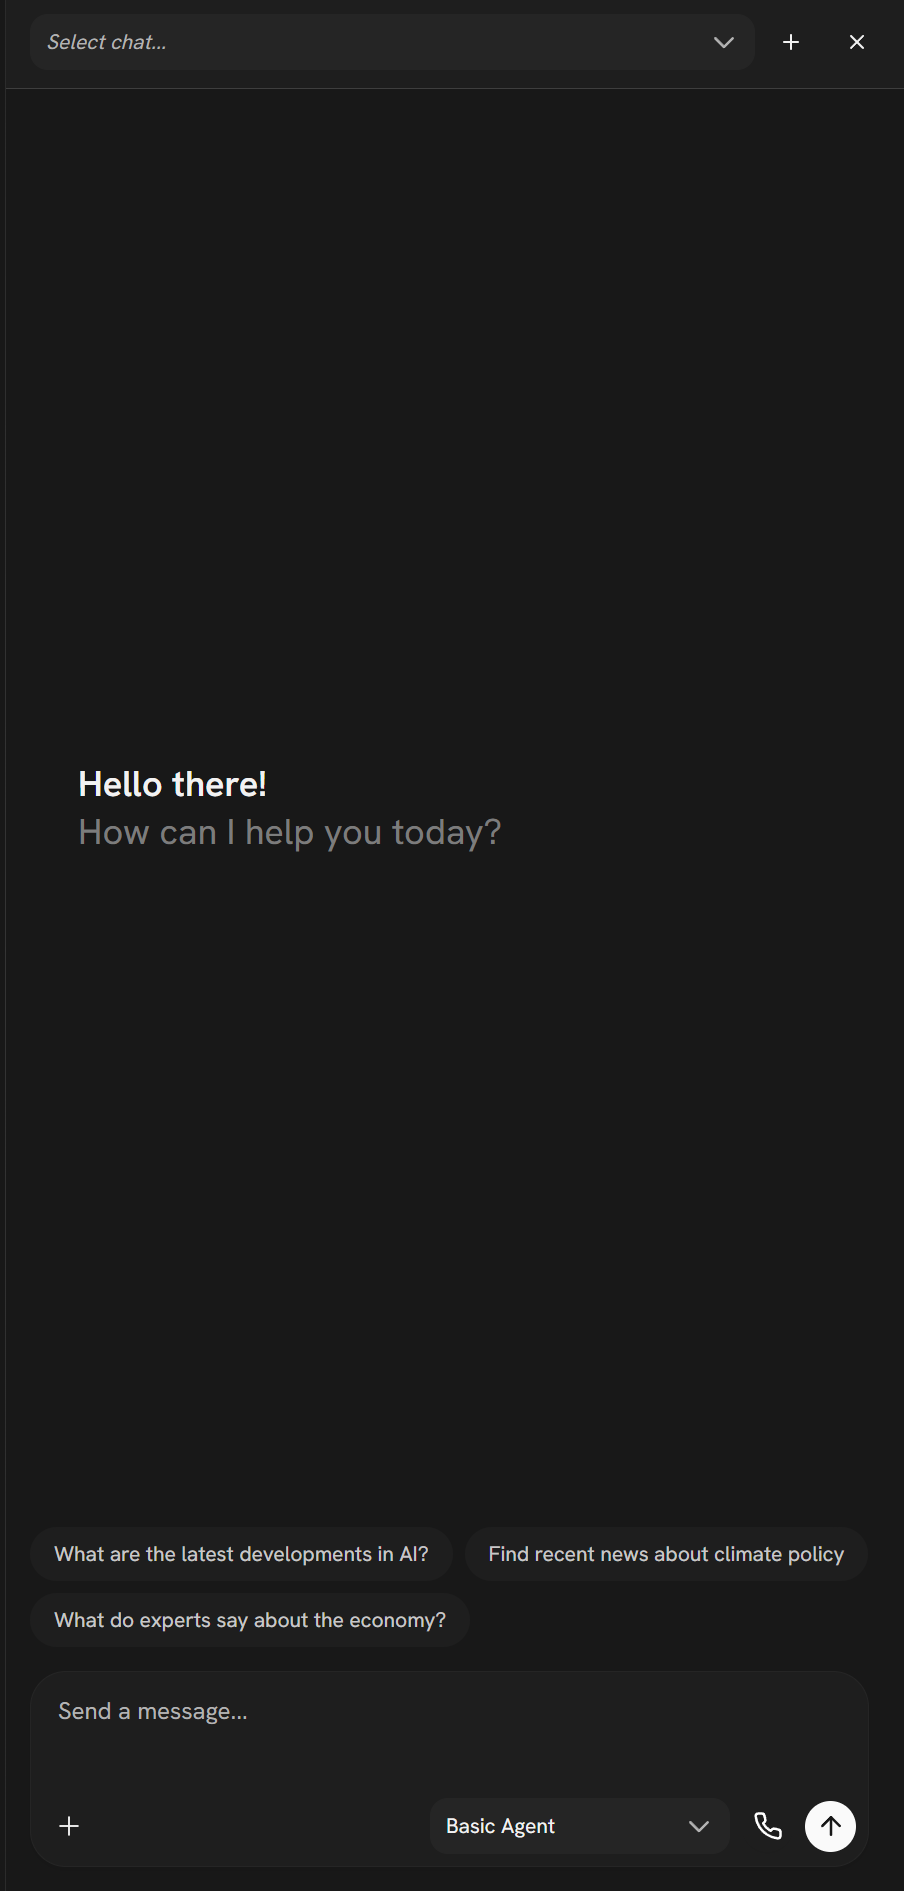
**Purpose:** Interactive, conversational interface for testing and debugging workflows.
**Features:**
* In-editor sliding panel
* Chat-based conversational interaction with real-time streaming
* Node execution highlighting on the canvas
* Multiple chat sessions management
* Persistent chat history with context memory
* Entry node selection
**Chat Actions:**
* Create new chat
* Switch between existing chats
* Clear chat memory (flush history)
* Delete chat
* Share chat publicly
* Leave chat session
## Workflow Lifecycle
When you create a new workflow, Splox automatically:
* Generates a unique workflow ID
* Sets up an empty canvas
* Assigns it to your account
* Creates initial configuration
Build your workflow by:
* Adding nodes from the context menu
* Connecting nodes with edges
* Configuring each node's settings (LLM model, system prompt, tools, etc.)
* Saving your changes
**Start simple** — begin with a Start → Agent flow and add complexity as needed.
### Chat Mode
**Purpose:** Interactive, conversational interface for testing and debugging workflows.
**Features:**
* In-editor sliding panel
* Chat-based conversational interaction with real-time streaming
* Node execution highlighting on the canvas
* Multiple chat sessions management
* Persistent chat history with context memory
* Entry node selection
**Chat Actions:**
* Create new chat
* Switch between existing chats
* Clear chat memory (flush history)
* Delete chat
* Share chat publicly
* Leave chat session
 ### Execution Flow
Choose where to begin execution from the available entry nodes
Enter required parameters, messages, or upload files
Execute using Chat Mode or the API
Watch real-time status updates and streaming output as nodes process
See agent responses, tool results, and review execution logs
Once tested, deploy your workflow by:
* Setting up triggers (webhooks, API calls)
* Configuring execution settings
* Enabling the workflow
* Monitoring the first few runs
After deployment, monitor your workflow:
* View execution history and tree
* Check success/failure rates
* Review error logs
* Analyze performance metrics
## Execution Model
### Sequential Flow
The simplest pattern: nodes execute one after another.
### Execution Flow
Choose where to begin execution from the available entry nodes
Enter required parameters, messages, or upload files
Execute using Chat Mode or the API
Watch real-time status updates and streaming output as nodes process
See agent responses, tool results, and review execution logs
Once tested, deploy your workflow by:
* Setting up triggers (webhooks, API calls)
* Configuring execution settings
* Enabling the workflow
* Monitoring the first few runs
After deployment, monitor your workflow:
* View execution history and tree
* Check success/failure rates
* Review error logs
* Analyze performance metrics
## Execution Model
### Sequential Flow
The simplest pattern: nodes execute one after another.
```mermaid theme={null}
%%{init: {'theme':'base', 'themeVariables': {'primaryColor':'#f5f5f5','primaryTextColor':'#171717','primaryBorderColor':'#171717','lineColor':'#171717','secondaryColor':'#ffffff','tertiaryColor':'#f5f5f5','background':'#ffffff','mainBkg':'#f5f5f5','secondBkg':'#ffffff','textColor':'#171717','nodeTextColor':'#171717','nodeBorder':'#171717','edgeLabelBackground':'#ffffff'}}}%%
graph LR
Start[Start] --> Agent[Agent] --> Next[Agent 2]
style Start fill:#ffffff,stroke:#171717
style Agent fill:#ffffff,stroke:#171717
style Next fill:#ffffff,stroke:#171717
```
```mermaid theme={null}
%%{init: {'theme':'base', 'themeVariables': {'primaryColor':'#252526','primaryTextColor':'#fafafa','primaryBorderColor':'#fafafa','lineColor':'#fafafa','secondaryColor':'#1e1e1e','tertiaryColor':'#252526','background':'#1e1e1e','mainBkg':'#252526','secondBkg':'#1e1e1e','textColor':'#fafafa','nodeTextColor':'#fafafa','nodeBorder':'#fafafa','edgeLabelBackground':'#252526'}}}%%
graph LR
Start[Start] --> Agent[Agent] --> Next[Agent 2]
style Start fill:#1e1e1e,stroke:#fafafa
style Agent fill:#1e1e1e,stroke:#fafafa
style Next fill:#1e1e1e,stroke:#fafafa
```
Each node completes before the next one begins. Data flows forward through variable mappings.
### Parallel Execution
Use **parallel edges** to fan out and a **Merge node** to fan back in:
```mermaid theme={null}
%%{init: {'theme':'base', 'themeVariables': {'primaryColor':'#f5f5f5','primaryTextColor':'#171717','primaryBorderColor':'#171717','lineColor':'#171717','secondaryColor':'#ffffff','tertiaryColor':'#f5f5f5','background':'#ffffff','mainBkg':'#f5f5f5','secondBkg':'#ffffff','textColor':'#171717','nodeTextColor':'#171717','nodeBorder':'#171717','edgeLabelBackground':'#ffffff'}}}%%
graph LR
Start[Start] --> Agent1[Agent 1]
Start --> Agent2[Agent 2]
Agent1 --> Merge[Merge]
Agent2 --> Merge
Merge --> Final[Agent 3]
style Start fill:#ffffff,stroke:#171717
style Agent1 fill:#ffffff,stroke:#171717
style Agent2 fill:#ffffff,stroke:#171717
style Merge fill:#ffffff,stroke:#171717
style Final fill:#ffffff,stroke:#171717
```
```mermaid theme={null}
%%{init: {'theme':'base', 'themeVariables': {'primaryColor':'#252526','primaryTextColor':'#fafafa','primaryBorderColor':'#fafafa','lineColor':'#fafafa','secondaryColor':'#1e1e1e','tertiaryColor':'#252526','background':'#1e1e1e','mainBkg':'#252526','secondBkg':'#1e1e1e','textColor':'#fafafa','nodeTextColor':'#fafafa','nodeBorder':'#fafafa','edgeLabelBackground':'#252526'}}}%%
graph LR
Start[Start] --> Agent1[Agent 1]
Start --> Agent2[Agent 2]
Agent1 --> Merge[Merge]
Agent2 --> Merge
Merge --> Final[Agent 3]
style Start fill:#1e1e1e,stroke:#fafafa
style Agent1 fill:#1e1e1e,stroke:#fafafa
style Agent2 fill:#1e1e1e,stroke:#fafafa
style Merge fill:#1e1e1e,stroke:#fafafa
style Final fill:#1e1e1e,stroke:#fafafa
```
Both Agent nodes run simultaneously. The Merge node waits for all parents to complete, then combines their outputs (objects are merged, arrays concatenated).
### Conditional Branching
Use the **Switch node** for conditional logic:
```mermaid theme={null}
%%{init: {'theme':'base', 'themeVariables': {'primaryColor':'#f5f5f5','primaryTextColor':'#171717','primaryBorderColor':'#171717','lineColor':'#171717','secondaryColor':'#ffffff','tertiaryColor':'#f5f5f5','background':'#ffffff','mainBkg':'#f5f5f5','secondBkg':'#ffffff','textColor':'#171717','nodeTextColor':'#171717','nodeBorder':'#171717','edgeLabelBackground':'#ffffff'}}}%%
graph LR
Start[Start] --> Switch{Switch}
Switch -->|Condition A| AgentA[Agent A]
Switch -->|Condition B| AgentB[Agent B]
Switch -->|Default| AgentC[Agent C]
style Start fill:#ffffff,stroke:#171717
style Switch fill:#ffffff,stroke:#171717
style AgentA fill:#ffffff,stroke:#171717
style AgentB fill:#ffffff,stroke:#171717
style AgentC fill:#ffffff,stroke:#171717
```
```mermaid theme={null}
%%{init: {'theme':'base', 'themeVariables': {'primaryColor':'#252526','primaryTextColor':'#fafafa','primaryBorderColor':'#fafafa','lineColor':'#fafafa','secondaryColor':'#1e1e1e','tertiaryColor':'#252526','background':'#1e1e1e','mainBkg':'#252526','secondBkg':'#1e1e1e','textColor':'#fafafa','nodeTextColor':'#fafafa','nodeBorder':'#fafafa','edgeLabelBackground':'#252526'}}}%%
graph LR
Start[Start] --> Switch{Switch}
Switch -->|Condition A| AgentA[Agent A]
Switch -->|Condition B| AgentB[Agent B]
Switch -->|Default| AgentC[Agent C]
style Start fill:#1e1e1e,stroke:#fafafa
style Switch fill:#1e1e1e,stroke:#fafafa
style AgentA fill:#1e1e1e,stroke:#fafafa
style AgentB fill:#1e1e1e,stroke:#fafafa
style AgentC fill:#1e1e1e,stroke:#fafafa
```
The Switch node evaluates conditions with operators like `contains`, `equal`, `greater_than`, `starts_with`, `is_empty`, and more. Each case routes to a different branch via conditional edges.
### Agent Tool Loop
The **Agent node** is the core of agentic workflows. It autonomously calls tools, processes results, and iterates until the task is complete — all within a single node:
```mermaid theme={null}
%%{init: {'theme':'base', 'themeVariables': {'primaryColor':'#f5f5f5','primaryTextColor':'#171717','primaryBorderColor':'#171717','lineColor':'#171717','secondaryColor':'#ffffff','tertiaryColor':'#f5f5f5','background':'#ffffff','mainBkg':'#f5f5f5','secondBkg':'#ffffff','textColor':'#171717','nodeTextColor':'#171717','nodeBorder':'#171717','edgeLabelBackground':'#ffffff'}}}%%
graph LR
Start([Start]) --> Agent[Agent]
Agent -.->|tool edge| T1[Tool A]
Agent -.->|tool edge| T2[Tool B]
Agent -.->|tool edge| T3[Tool C]
Agent -->|done| Next[Next Node]
style Start fill:#ffffff,stroke:#171717
style Agent fill:#ffffff,stroke:#171717,stroke-width:2px
style T1 fill:#ffffff,stroke:#171717
style T2 fill:#ffffff,stroke:#171717
style T3 fill:#ffffff,stroke:#171717
style Next fill:#ffffff,stroke:#171717
```
```mermaid theme={null}
%%{init: {'theme':'base', 'themeVariables': {'primaryColor':'#252526','primaryTextColor':'#fafafa','primaryBorderColor':'#fafafa','lineColor':'#fafafa','secondaryColor':'#1e1e1e','tertiaryColor':'#252526','background':'#1e1e1e','mainBkg':'#252526','secondBkg':'#1e1e1e','textColor':'#fafafa','nodeTextColor':'#fafafa','nodeBorder':'#fafafa','edgeLabelBackground':'#252526'}}}%%
graph LR
Start([Start]) --> Agent[Agent]
Agent -.->|tool edge| T1[Tool A]
Agent -.->|tool edge| T2[Tool B]
Agent -.->|tool edge| T3[Tool C]
Agent -->|done| Next[Next Node]
style Start fill:#1e1e1e,stroke:#fafafa
style Agent fill:#1e1e1e,stroke:#fafafa,stroke-width:2px
style T1 fill:#1e1e1e,stroke:#fafafa
style T2 fill:#1e1e1e,stroke:#fafafa
style T3 fill:#1e1e1e,stroke:#fafafa
style Next fill:#1e1e1e,stroke:#fafafa
```
**How the Agent Loop Works:**
The Agent node receives input from its parent (entry node payload, previous node output, or variable mappings) and appends it as a user message to its context memory.
The Agent's configured LLM analyzes the conversation context (system prompt + memory + current input) and decides what action to take. It can either respond with text or call one or more tools.
If the LLM requests tool calls, the Agent executes them via connected Tool nodes (through tool edges). Tool results are appended to the conversation context.
The Agent loops back to the LLM with tool results. The LLM can call more tools or produce a final response. This continues until:
* The LLM responds without tool calls (task complete)
* The **max iterations** limit is reached (configurable, default: 50, max: 50)
The Agent's final response flows to downstream nodes via parallel edges.
**Key Agent Capabilities:**
The Agent has **built-in conversation memory** — no separate memory node needed.
* **Memory ID:** Links conversations across executions (e.g., `{{ start.chat_id }}`)
* **Limit Type:** Token-based or message-based limits
* **Trim Strategy:** `drop_oldest` or `drop_middle` when limits are reached
* **Summarization:** Automatically summarize old messages to preserve context
* **Custom Messages:** Inject predefined messages into the conversation
* **Provider & Model:** Choose from Anthropic, OpenAI, Gemini, OpenRouter, and more
* **System Prompt:** Jinja2 template with variable mapping support
* **Tool Choice:** `auto`, `required`, `none`, or specific tool name
* **Thinking Tokens:** Enable extended thinking for complex reasoning
* **Streaming:** Real-time token-by-token output
* **Cache Control:** Optimize costs with prompt caching
* **Max Iterations:** 1–50 (default: 50). Limits how many tool-call rounds the agent can perform.
* **On Tool Error:** `continue` (skip failed tools) or `fail` (stop the agent)
* **Enable Streaming:** Real-time token output via SSE
* **Chat Streaming Mode:** `session` for persistent chat, or per-execution
* **Voice/Realtime:** Audio streaming with supported providers (OpenAI, Gemini)
### Multi-Agent Workflows
Multiple Agent nodes can be connected to create collaborative multi-agent systems. When one Agent connects to another via a **tool edge**, the child agent becomes a tool the parent can call. The child agent can be configured with different **execution modes**:
**`sync`** — Parent agent blocks and waits for the child agent to complete before continuing.
Best for: Sequential delegation where the parent needs the child's result to proceed.
**`async_inject`** — Parent agent continues immediately. When the child completes, its result is automatically injected into the parent's conversation context.
Best for: Background tasks where the parent can continue working while waiting for results.
**`async_bidir`** — Both agents run concurrently. The child agent gets a `reply_to_parent` tool to send messages back to the parent at any time.
Best for: Collaborative agents that need ongoing communication.
**`fire_forget`** — Parent triggers the child and continues immediately. No response is expected or received.
Best for: Side effects, logging, notifications, or tasks where the result doesn't matter.
**`handoff`** — Parent agent exits completely, transferring control to the child agent. The child takes over the conversation.
Best for: Routing to specialized agents (e.g., escalation from a triage agent to a support agent).
```mermaid theme={null}
%%{init: {'theme':'base', 'themeVariables': {'primaryColor':'#f5f5f5','primaryTextColor':'#171717','primaryBorderColor':'#171717','lineColor':'#171717','secondaryColor':'#ffffff','tertiaryColor':'#f5f5f5','background':'#ffffff','mainBkg':'#f5f5f5','secondBkg':'#ffffff','textColor':'#171717','nodeTextColor':'#171717','nodeBorder':'#171717','edgeLabelBackground':'#ffffff'}}}%%
graph LR
Start([Start]) --> Orchestrator[Orchestrator Agent]
Orchestrator -->|sync| Researcher[Research Agent]
Orchestrator -->|async_inject| Writer[Writer Agent]
Orchestrator -->|fire_forget| Logger[Logger Agent]
style Start fill:#ffffff,stroke:#171717
style Orchestrator fill:#ffffff,stroke:#171717,stroke-width:2px
style Researcher fill:#ffffff,stroke:#171717
style Writer fill:#ffffff,stroke:#171717
style Logger fill:#ffffff,stroke:#171717
```
```mermaid theme={null}
%%{init: {'theme':'base', 'themeVariables': {'primaryColor':'#252526','primaryTextColor':'#fafafa','primaryBorderColor':'#fafafa','lineColor':'#fafafa','secondaryColor':'#1e1e1e','tertiaryColor':'#252526','background':'#1e1e1e','mainBkg':'#252526','secondBkg':'#1e1e1e','textColor':'#fafafa','nodeTextColor':'#fafafa','nodeBorder':'#fafafa','edgeLabelBackground':'#252526'}}}%%
graph LR
Start([Start]) --> Orchestrator[Orchestrator Agent]
Orchestrator -->|sync| Researcher[Research Agent]
Orchestrator -->|async_inject| Writer[Writer Agent]
Orchestrator -->|fire_forget| Logger[Logger Agent]
style Start fill:#1e1e1e,stroke:#fafafa
style Orchestrator fill:#1e1e1e,stroke:#fafafa,stroke-width:2px
style Researcher fill:#1e1e1e,stroke:#fafafa
style Writer fill:#1e1e1e,stroke:#fafafa
style Logger fill:#1e1e1e,stroke:#fafafa
```
**Agent-to-Agent Configuration:**
When connecting agents, you can configure:
* **Execution Mode:** How the child agent runs relative to the parent (see tabs above)
* **Child Tool Name & Description:** How the child agent appears as a tool to the parent
* **Reply Tool Name & Description:** For bidirectional mode, how the reply-to-parent tool appears
**Collaboration Patterns:**
* **Orchestrator Model:** One agent coordinates tasks by delegating to specialized child agents
* **Peer-to-Peer:** Agents communicate bidirectionally using `async_bidir` mode
* **Pipeline:** Agents chain sequentially, each processing and passing results forward
* **Handoff Chain:** Agents hand off control based on the conversation topic
Multi-agent workflows excel at complex tasks that benefit from specialized expertise, parallel processing, and collaborative reasoning.
### Error Handling
Every node can have an **error edge** that activates when the node fails:
```mermaid theme={null}
%%{init: {'theme':'base', 'themeVariables': {'primaryColor':'#f5f5f5','primaryTextColor':'#171717','primaryBorderColor':'#171717','lineColor':'#171717','secondaryColor':'#ffffff','tertiaryColor':'#f5f5f5','background':'#ffffff','mainBkg':'#f5f5f5','secondBkg':'#ffffff','textColor':'#171717','nodeTextColor':'#171717','nodeBorder':'#171717','edgeLabelBackground':'#ffffff'}}}%%
graph LR
Agent[Agent] -->|success| Next[Next Node]
Agent -->|error| Fallback[Fallback Agent]
style Agent fill:#ffffff,stroke:#171717
style Next fill:#ffffff,stroke:#171717
style Fallback fill:#ffffff,stroke:#171717
```
```mermaid theme={null}
%%{init: {'theme':'base', 'themeVariables': {'primaryColor':'#252526','primaryTextColor':'#fafafa','primaryBorderColor':'#fafafa','lineColor':'#fafafa','secondaryColor':'#1e1e1e','tertiaryColor':'#252526','background':'#1e1e1e','mainBkg':'#252526','secondBkg':'#1e1e1e','textColor':'#fafafa','nodeTextColor':'#fafafa','nodeBorder':'#fafafa','edgeLabelBackground':'#252526'}}}%%
graph LR
Agent[Agent] -->|success| Next[Next Node]
Agent -->|error| Fallback[Fallback Agent]
style Agent fill:#1e1e1e,stroke:#fafafa
style Next fill:#1e1e1e,stroke:#fafafa
style Fallback fill:#1e1e1e,stroke:#fafafa
```
When a node fails:
1. Its **parallel (success) edges** are marked as skipped
2. Its **error edges** are activated, routing to fallback nodes
3. Downstream nodes on the skipped path are also marked as skipped
For Agent nodes, the `on_tool_error` setting controls whether individual tool failures cause the entire agent to fail (`fail`) or are reported back to the LLM to handle gracefully (`continue`).
Error edges are indicated by red connections in the workflow editor.
## Node Execution States
During execution, each node transitions through these states:
| Status | Description |
| --------------- | ----------------------------------------------------------- |
| **Pending** | Node is queued, waiting for parent nodes to complete |
| **In Progress** | Node is currently executing |
| **Completed** | Node finished successfully |
| **Failed** | Node encountered an error |
| **Blocked** | Node is waiting for external input (e.g., tool approval) |
| **Skipped** | Node was skipped (parent took a different branch or failed) |
| **Stopped** | Execution was manually stopped |
| **Waiting** | Node is waiting for async child agents to complete |
For detailed state transitions, see the [Node Lifecycle](/nodes/lifecycle) documentation.
## Best Practices
Begin with a Start → Agent flow, then add tools and complexity as needed
Name nodes clearly: "Research Agent" not "Node 1"
Add error edges to critical nodes for graceful failure handling
Configure appropriate max iterations on Agent nodes to prevent runaway loops
Use the Agent's built-in memory for conversational workflows instead of managing state manually
Use the right agent-to-agent execution mode — sync for dependencies, fire\_forget for side effects
## Next Steps
Deep dive into the Agent node — the core of every workflow
Learn about all node types and their capabilities
How to connect nodes and control data flow
Step-by-step tutorial to build your first AI agent